It as been confirmed sadly,that the King of Pop,The Icon,the Genius is Dead.
This is truly one of the saddest days on earth.
Music and the Music Industry and the Entertainment world will never be the same again.
Thursday, June 25, 2009
Sunday, June 21, 2009
Buying new vs Upgrading your old Computer
The world of IT and computing as come to a point where innovation,new developments,upgrades etc as become the trend.More often than not,most if not all gadgets or equipments only have a lifeline of few months,for them to become old or not good enough.
This as made competition become the in-thing among vendors and this as also affected the pocket or purchasing power of consumers.It as become very common among the consumers of the following items in particular:Computers(Laptop.Desktop,servers and other components),Mobile and Fixed line phones,Motor Vehicles e.t.c
You've come to a point where you need to upgrade to a higher spec of computer but you don't have enough cash to make the change.I have over time used a method to overcome this issue,thereby saving money and getting the higher grade that i want.I will for now limit this to Computers.
The basic components of most systems are:OS,Screen size,Weight,Optical Drive,Memory,Hard disk & Processor.Among all this,the basic ones which determine prices are:Optical Drive,Memory,Hard Disk and Processor.
The catch here is this:If i have a system of about $250 with obviously a lower spec and a new or a higher spec one which goes for $450.what i readily do is to buy (Optical drive,Memory & Hard drive) of a higher spec and install on the old/lower spec system.this normally cost me around $80 - $120,which comes to about $320 - $370,therefore,saving about $80 - $130
This is a simple tactics which could save from hundreds to thousands of dollars on a budget.
A check on the net will get you more than enough information on the above subject.
One of the main considerations on the above mechanism is to know where this components are located and how to fixed them.
If you'd like to send questions to me, please feel free to visit my Website and I'll be happy to answer your queries, or point you in the right direction.
Good luck!
Wednesday, June 17, 2009
Restore the missing Recycle Bin on your desktop
In Vista:
1. Click Start, and then click Control Panel.
2. Click Appearance and Personalization, click Personalization, and then click Change desktop icons.
3. Click to select the Recycle Bin check box, and then click OK.
In XP:
1. Click Start, and then click Run.
2. In the Open box, type regedit, and then click OK.
3. Locate the following registry key:
HKEY_CURRENT_USER\Software\Microsoft\Win...
4. In the right pane, right-click the following registry DWORD value, and then click Modify:
{645FF040-5081-101B-9F08-00AA002F954E}
5. In the Value data box, type 0, and then click OK. (The TweakUI utility sets this value to 1 to hide the Recycle Bin icon.)
6. Quit Registry Editor.
Sunday, June 14, 2009
10 Tips for What should you do if…
1. …while fixing the port or cable of your PC, you accidentally bend a pin? Do not use pliers to straighten it out. It might force it to break and that will be a bigger problem. Just use the tip of a mechanical pencil with a large diameter. Insert the pin inside and start straightening.
2. … the Wi-Fi network is as slow as a turtle? Check your network settings. If there is no network outage then it will most likely be interference from microwaves or the static from cordless phones. You also might be on a jam-packed channel. Just try switching the channel of your router.
3. … a key from the keyboard fell off? If the key is one of those rarely used, then you are ok for the meantime. But if it is frequently used key that is busted, like the letter e or delete button, then choose another key from your keyboard to replace it. if you don’t want to scavenge for keys, some sites offer replacement keyboards.
4. … irrelevant papers are coming out of your printer? Turn it off for one minute then turn it on again. A previous print job that was canceled may have not been erased properly from the printer’s memory. Then go to the print queue to cancel any existing print job that may affect again your printer’s memory. If it doesn’t help, then you may have to reinstall your driver.
5. …your default printer has changed? You will have to reassign it again. There are a few applications that may install printer like devices as output options and some even make them the default automatically. Go to the control panel for printers. Right click on the preferred printer and set again as default. If problems persist, reinstall your driver.
6. …the folders display only large icons? Go to Windows Explorer to change the default and the right view on any folder. Then click the View tab to apply this default setting to all folders.
7. …error messages on memory problems keep on popping up everyday? Check your computer to see if your RAM is really having problems by downloading a program that can check it thoroughly. Or better yet, have a computer technician check it for you.
8. …you have a very long start up time? Prune the applications that run your PC as to which ones you would like to start at boot up. Click on Start, Run, then enter msconfig. Select from the list of applications those you want to run on start.
9. …the video has no sound or image? Check first your speakers if they are working right. Check the video if it is working. Also, update your codecs.
10. …the display looks very bad? Look at your display settings by making a right click on your desktop to choose settings in properties. If you can not increase your resolution and color quality, select advanced, adapter. You can also reinstall the driver for your VGA adapter. 
2. … the Wi-Fi network is as slow as a turtle? Check your network settings. If there is no network outage then it will most likely be interference from microwaves or the static from cordless phones. You also might be on a jam-packed channel. Just try switching the channel of your router.
3. … a key from the keyboard fell off? If the key is one of those rarely used, then you are ok for the meantime. But if it is frequently used key that is busted, like the letter e or delete button, then choose another key from your keyboard to replace it. if you don’t want to scavenge for keys, some sites offer replacement keyboards.
4. … irrelevant papers are coming out of your printer? Turn it off for one minute then turn it on again. A previous print job that was canceled may have not been erased properly from the printer’s memory. Then go to the print queue to cancel any existing print job that may affect again your printer’s memory. If it doesn’t help, then you may have to reinstall your driver.
5. …your default printer has changed? You will have to reassign it again. There are a few applications that may install printer like devices as output options and some even make them the default automatically. Go to the control panel for printers. Right click on the preferred printer and set again as default. If problems persist, reinstall your driver.
6. …the folders display only large icons? Go to Windows Explorer to change the default and the right view on any folder. Then click the View tab to apply this default setting to all folders.
7. …error messages on memory problems keep on popping up everyday? Check your computer to see if your RAM is really having problems by downloading a program that can check it thoroughly. Or better yet, have a computer technician check it for you.
8. …you have a very long start up time? Prune the applications that run your PC as to which ones you would like to start at boot up. Click on Start, Run, then enter msconfig. Select from the list of applications those you want to run on start.
9. …the video has no sound or image? Check first your speakers if they are working right. Check the video if it is working. Also, update your codecs.
10. …the display looks very bad? Look at your display settings by making a right click on your desktop to choose settings in properties. If you can not increase your resolution and color quality, select advanced, adapter. You can also reinstall the driver for your VGA adapter.
How to Correct System Hang at Startup
If your system hangs about 2 or 3 minutes at startup, where you can't access the Start button or the Taskbar, it may be due to one specific service (Background Intelligent Transfer) running in the background.
Here's what you do:
Here's what you do:
- Click on Start
- Run... type msconfig OK.
- Go to the 'Services' tab,
- Find the 'Background Intelligent Transfer' service.
- Disable it (uncheck), apply the changes & reboot.
How to check if rootkit is installed on your computer
Download and install RootkitRevealer to check if you have any RootKit installed. ( Rootkits are powerful tools to compromise computer systems without detection.)
RootkitRevealer is a freeware advanced rootkit detection utility. It runs on Windows NT 4 and higher and its output lists Registry and file system API discrepancies that may indicate the presence of a user-mode or kernel-mode rootkit. RootkitRevealer successfully detects all persistent rootkits
RootkitRevealer is a freeware advanced rootkit detection utility. It runs on Windows NT 4 and higher and its output lists Registry and file system API discrepancies that may indicate the presence of a user-mode or kernel-mode rootkit. RootkitRevealer successfully detects all persistent rootkits
How to ignore Cyclic Redundancy
"Cannot copy... Data error (cyclic redundancy check)" these errors occur during copying from a CD or DVD that are physically damaged (scratches, bent, scraped, etc…). These errors will just pops out meaning the computer has just detected a damaged file. The copy process is then aborted with no option of retrying to read from the damaged area or skipping over it. This is very frustrating when copying large files because you must try to look for the damaged files or just copy it from the very start. But there’s a procedure for that can ignore or fix dose damaged files:
1. Download JFileRecovery from this link http://filerecovery.hostyourself.net/software.and (this is a free cross platform) install it.
2. Specify which file you need to recover
3. Set the destination where you want it to be copied
4. The software will indicate which part of the file is damaged and you may retry this area.
5. The file can now be copied without any CRC errors
How to save all the drivers before reformat
Driver Collector is a handy tool which finds and collects the installed driver files for the hardware you select on your PC. After it collects the files, the program copies to your hard drive, in a specific folder.
Download Driver Collector here
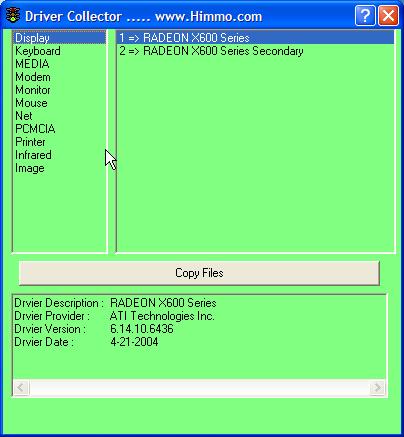
Download Driver Collector here
Faster Browsing On Your Windows XP computer
Here's a great tip to speed up your browsing on Windows XP machines. Its actually created to fix the bug installed as default in Windows 2000 that scans shared files for Scheduled Tasks. And it turns out that you can experience a slow response as long as 30 seconds when you try to view shared files across a network because Windows 2000 is using the extra time to search the remote computer for any Scheduled Tasks. Note that this fix is originally intended for only those affected, Windows 2000 users will experience that the actual browsing speed of both the Internet & Windows Explorers improve significantly after applying it since it doesn't search for Scheduled Tasks anymore. Here's how :
Open up the Registry and go to :
HKEY_L0CAL_MACHINE/Sftware/Microsoft/Windows/Current Version/Explorer/RemoteComputer/NameSpace
Under that branch, select the key :
{D6277990-4C6A-11CF-8D87-00AA0060F5BF}
and delete it.
This is key that commands Windows to search for Scheduled Tasks. If you like you may try exporting the exact branch so that you can restore the key if necessary.
This fix is so effective that it doesn't require a restart and you can almost immediately determine yourself how much it speeds up your browsing processes.
NOTE = always do a backup before changing anything in the registry.... LOL
Tips on Searching Hidden Files (XP)
The Search tool in Windows XP searches for hidden and system files differently than in earlier versions of Windows. This guide will give a brief description on how to search for hidden or system files in Windows XP.
Search for Hidden or System Files By default, the Search tool doesn’t search for hidden or system files. Because of this, you may have difficulty in finding files, even though they exist on the drive.
To search for hidden or system files in Windows XP:
Click Start then click Search, click all files and folders, and then click more advanced options.
Click the check box to select the Search system folders and Search hidden files and folders check boxes.
NOTE: You don’t need to configure your computer to show hidden files in the Folder Options dialog box in Windows Explorer to find files with either the hidden or system attributes, but you need to configure your computer not to hide protected operating system files to find files with both the hidden and system attributes. The Search Companion shares the Hide protected operating system files option (which hides files with both the system and hidden attributes) with the Folder Options dialog box Windows Explorer.
Windows Xp Hidden Apps
To run any of these apps go to Start > Run and type the executable name (ie charmap).
WINDOWS XP HIDDEN APPS:
=========================================
1) Character Map = charmap.exe (very useful for finding unusual characters)
2) Disk Cleanup = cleanmgr.exe
3) Clipboard Viewer = clipbrd.exe (views contents of Windows clipboard)
4) Dr Watson = drwtsn32.exe (Troubleshooting tool)
5) DirectX diagnosis = dxdiag.exe (Diagnose & test DirectX, video & sound cards)
6) Private character editor = eudcedit.exe (allows creation or modification of characters)
7) IExpress Wizard = iexpress.exe (Create self-extracting / self-installing package)
 Microsoft Synchronization Manager = mobsync.exe (appears to allow synchronization of files on the network for when working offline. Apparently undocumented).
9) Windows Media Player 5.1 = mplay32.exe (Retro version of Media Player, very basic).
10) ODBC Data Source Administrator = odbcad32.exe (something to do with databases)
11) Object Packager = packager.exe (to do with packaging objects for insertion in files, appears to have comprehensive help files).
12) System Monitor = perfmon.exe (very useful, highly configurable tool, tells you everything you ever wanted to know about any aspect of PC performance, for uber-geeks only )
13) Program Manager = progman.exe (Legacy Windows 3.x desktop shell).
14) Remote Access phone book = rasphone.exe (documentation is virtually non-existant).
15) Registry Editor = regedt32.exe [also regedit.exe] (for hacking the Windows Registry).
16) Network shared folder wizard = shrpubw.exe (creates shared folders on network).
17) File siganture verification tool = sigverif.exe
1 Volume Contro = sndvol32.exe (I've included this for those people that lose it from the System Notification area).
19) System Configuration Editor = sysedit.exe (modify System.ini & Win.ini just like in Win98! ).
20) Syskey = syskey.exe (Secures XP Account database - use with care, it's virtually undocumented but it appears to encrypt all passwords, I'm not sure of the full implications).
21) Microsoft Telnet Client = telnet.exe
22) Driver Verifier Manager = verifier.exe (seems to be a utility for monitoring the actions of drivers, might be useful for people having driver problems. Undocumented).
23) Windows for Workgroups Chat = winchat.exe (appears to be an old NT utility to allow chat sessions over a LAN, help files available).
24) System configuration = msconfig.exe (can use to control starup programs)
25) gpedit.msc used to manage group policies, and permissions
WINDOWS XP HIDDEN APPS:
=========================================
1) Character Map = charmap.exe (very useful for finding unusual characters)
2) Disk Cleanup = cleanmgr.exe
3) Clipboard Viewer = clipbrd.exe (views contents of Windows clipboard)
4) Dr Watson = drwtsn32.exe (Troubleshooting tool)
5) DirectX diagnosis = dxdiag.exe (Diagnose & test DirectX, video & sound cards)
6) Private character editor = eudcedit.exe (allows creation or modification of characters)
7) IExpress Wizard = iexpress.exe (Create self-extracting / self-installing package)
9) Windows Media Player 5.1 = mplay32.exe (Retro version of Media Player, very basic).
10) ODBC Data Source Administrator = odbcad32.exe (something to do with databases)
11) Object Packager = packager.exe (to do with packaging objects for insertion in files, appears to have comprehensive help files).
12) System Monitor = perfmon.exe (very useful, highly configurable tool, tells you everything you ever wanted to know about any aspect of PC performance, for uber-geeks only )
13) Program Manager = progman.exe (Legacy Windows 3.x desktop shell).
14) Remote Access phone book = rasphone.exe (documentation is virtually non-existant).
15) Registry Editor = regedt32.exe [also regedit.exe] (for hacking the Windows Registry).
16) Network shared folder wizard = shrpubw.exe (creates shared folders on network).
17) File siganture verification tool = sigverif.exe
1
19) System Configuration Editor = sysedit.exe (modify System.ini & Win.ini just like in Win98! ).
20) Syskey = syskey.exe (Secures XP Account database - use with care, it's virtually undocumented but it appears to encrypt all passwords, I'm not sure of the full implications).
21) Microsoft Telnet Client = telnet.exe
22) Driver Verifier Manager = verifier.exe (seems to be a utility for monitoring the actions of drivers, might be useful for people having driver problems. Undocumented).
23) Windows for Workgroups Chat = winchat.exe (appears to be an old NT utility to allow chat sessions over a LAN, help files available).
24) System configuration = msconfig.exe (can use to control starup programs)
25) gpedit.msc used to manage group policies, and permissions
How to Recover product key (CD-Key) of Windows/MS-Office
To recover your lost the product key of Windows XP or most versions of Office and have lost the CD case. Here is an small utility ProduKey which will display the ProductID and the CD-Key of MS-Office, Windows, Exchange Server, and SQL Server installed on your computer.
You can view this information for your current running operating system, or for another operating system/computer - by using command-line options. This utility can be useful if you lost the product key of your Windows/Office, and you want to reinstall it on your computer.
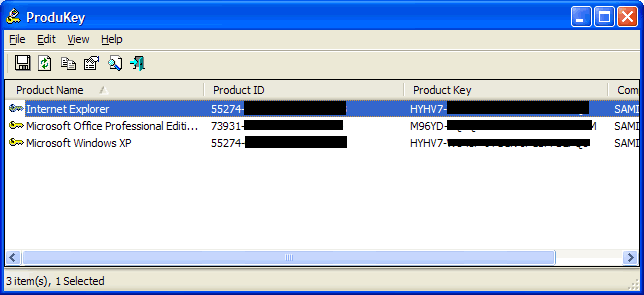
Download ProduKey
You can view this information for your current running operating system, or for another operating system/computer - by using command-line options. This utility can be useful if you lost the product key of your Windows/Office, and you want to reinstall it on your computer.
Download ProduKey
1 - Intro
 Place the extracted SP3 files
3 - Extract the Boot Image
 Successfully slipstreamed!
It’s been a while since anyone’s had to slipstream a Windows XP service pack, but seeing as how SP3 is now available, we thought we’d do a refresher course.
To create your own bootable Windows XP SP3 CD, you’ll need the following:
- A bootable Windows XP CD (any service pack level, Home or Professional)
- Windows XP SP3
- Bart’s Boot Image Extractor (BBIE)
- Nero Burning ROM (downloadable demo available)
You don’t have to use BBIE or Nero if you don’t want to, but this tutorial uses them. All you really need is an application which can extract the boot image from your current Windows XP CD, and a CD burning application which can utilise the boot image to create a new bootable CD. Choice of applications isn’t critical.
2 - Preparing the Data
You need to create a folder structure to hold all the necessary files on your PC locally before you burn them to CD.
I used a secondary hard drive (D:) and created two subfolders: XPSP2CD and XPSP3 (my XP CD already has SP2 slipstreamed), so I’ll use those names throughout the tutorial.
Copy the entire contents of the XP CD to D:\XPSP2CD, but first make sure that hidden files and folders are visible and that protection of system files is turned off via Windows Explorer.
To check this, go to Tools/Folder Options/View, check the radio button for “Show hidden files and folders” and make sure the checkbox next to “Hide protected operating system files” is unchecked.
Next, copy the SP3 standalone file (windowsxp-kb936929-sp3-x86-enu.exe) to D:\XPSP3. To extract the contents of the file you can use a file archiver like WinRar, but more simply just go Start/Run and type in:
D:\XPSP3\windowsxp-kb936929-sp3-x86-enu.exe –x
 Extract the service pack Extract the service pack |
This launches an extraction dialogue box. Extract the files to D:\XPSP3, and once that’s done you can delete the original SP3 file as it won’t be needed any more.
Place the extracted SP3 files3 - Extract the Boot Image
Download BBIE and extract the files to a local folder (in my case, D:\BBIE). Then, open a Command Windows, navigate to D:\BBIE and run the following command:
bbie x:
(Where x: is the optical drive with the XP CD.)
BBIE will search the CD for any available boot images, and extract them using an image1.bin, image2.bin, etc naming convention. There should only be one boot image on the XP CD. BBIE also can extract boot images from ISOs – just change the command to:
bbie x:\cdimage.iso
(Where x: is the folder containing the ISO, and cdimage.iso is the filename.)
The image1.bin will be stored in the active folder (D:\BBIE).
4 - Slipstream the Service PackTo integrate the service pack, go Start/Run and enter the following command:
D:\XPSP3\i386\update\update.exe /integrate:D:\XPSP2CD
 Slipstream the SP3 files Slipstream the SP3 files |
Note that there’s no space between /integrate: and D:\XPSP2CD. The upgrade program will launch and install the service pack into the locally cached CD, and confirm once it’s done.
Successfully slipstreamed!How to dual boot Windows XP and Linux (XP installed first)
1 - Boot Ubuntu from the Live CD

2 - Make room on the disk for Ubuntu
3 - Set up Ubuntu
As we're assuming that XP has already been installed (either via an OEM or self-installation) I won't run through the XP installation process. We'll further assume that XP has been installed to a single NTFS partition which takes up the whole disk.
One interesting thing to note though - Ubuntu is happy to read NTFS partitions, so one potential configuration option is to either create a 2nd NTFS partition which will house data for access by both operating systems, or simply a 2nd hard drive, again formatted with NTFS.
Install Ubuntu
You'll need the latest desktop ISO of Ubuntu (8.04). You can choose a list of download mirrors from the Ubuntu website, or use this link from Planetmirror. Download the ISO and burn it to CD to create bootable Ubuntu CD.
Boot the XP machine from the CD and select "Install Ubuntu" from the boot menu.

Once the Live CD has loaded, on the Welcome screen choose your language and select Forward.

On the "Where are you" (timezone) page, select your location and then Forward.

2 - Make room on the disk for Ubuntu

Ubuntu will then load the disk partitioner to determine where it's going to be installed. The default option is that Ubuntu will resize the Windows XP NTFS partition to make space for the Ubuntu install. You can drag the dividing line left or right to increase or decrease the amount of space to be freed up.
Once you're happy with the selection, click Forward.

3 - Set up Ubuntu

On the "Who are you?" screen, enter your username and password details, then click Forward.

On the Migrate Documents and Settings screen, if Ubuntu finds any user accounts to migrateit will happily import user settings from XP to Ubuntu. If it doesn't find any, obviously this isn't an option. Select as much or as little as you wish and click Forward.
On the "Ready to install" screen, you'll see that Ubuntu now has enough information to commence the installation. In the summary under Migrate Assistant, it should say "Windows XP Professional" along with any user account details you selected in the previous step
This means that regardless of whether Ubuntu found any user account to migrate, it certainly knows that Windows XP is installed on the other partition Click Install.

See the install through and then let it boot into Ubuntu.
When the install is complete the system will reboot. When the GRUB boot menu is displayed, have a look at the last entry in the list.

After the Ubuntu boot options, there will be an entry "Other operating systems" and beneath that "Microsoft Windows XP Professional". By default Ubuntu will load itself after 10 seconds, but you can select the XP option and the OS will boot normally.
The GRUB bootloader is decidedly better than XP's and XP doesn't handle dualbooting non-Microsoft operating systems very well, so there's little point trying to restore the XP bootloader. Be happy with GRUB!
How to dual-boot Vista with XP (with XP installed first)
Page 1 - Get Started - Using GParted
We assume that before you start this tutorial, you have backed up the drive (partitions and data) that will host the two operating systems.
Your first step will be to modify the Windows XP system partition to make space for Vista using GParted
The GParted Live CD ISO is available here – burn it to CD and boot the system from the disc. The version we used was 0.3.7-7.
When you boot from the GParted LiveCD, depending on your system, you should just need to select the auto-configuration boot option.

During boot, press Enter twice when prompted to select the keymap and language settings.
When the main GUI loads, right-click on the main Windows XP NTFS partition (depending on your setup, probably /dev/hda1) and select Resize/Move.

Use the slider to reduce the partition size and free up enough room to install Vista (at least 10GB) and click Resize/Move.

The changes haven’t actually been made, they’ve just been scheduled to run. To commit the changes and resize the partition, click Apply. GParted will ask to confirm the changes – hit OK and away you go.
Page 2 - Get Started - Using DISKPART

Boot the machine from the Vista DVD. Select the appropriate language and then "Install Now".
On the product key page, press SHIFT + F10 to launch a Windows PE 2.0 command window. Then type in DISKPART and press enter to get into the DISKPART utility.

Now type in LIST VOLUME - this gives you a readout of the volumes available on the system. Select the main Windows XP volume by typing in SELECT VOLUME 0 (in most cases it will be Volume 0 - in our lab in was Volume 1).

Now type in SHRINK. Vista will reduce the size the selected Volume by around 50%.
Page 3 - Now Install Vista

If you used the GParted LiveCD to shrink the XP partition, you'll need to reboot the system from the Vista install DVD. If you've used DISKPART then you just need to continue the installation. Once the install gets to the install location, there should be at least two options: a partition marked as Primary and unallocated space. Select the unallocated space and click Next. The install will then commence.
The Vista boot manager will take over the system completely, and Windows XP effectively loads via Vista. It’s all pretty seamless though, and you shouldn’t encounter any technical problems.
Page 4 - Modify Vista's Bootloader

Once Vista is installed and the system reboots, you’ll be presented with a boot menu with two options: “Microsoft Windows Vista” and "Earlier Version of Windows”.
This is perhaps a little bit bland, so you’ll probably want to change it. Here’s where one of the new features of Vista comes in, and it’s not so terrific. In Windows XP if you want to modify the bootloader, just right-click on My Computer, select Properties, go to the Advanced Tab, and click Settings under Startup and Recovery, then click Edit. This opens a local file – boot.ini. It’s just a standard text file and you can change pretty much anything. Unfortunately it’s not that easy in Vista – you can still navigate to the Startup and Recovery settings, but all you can do is select which operating system is the default and modify the timeout settings.
To edit Vista’s boot manager you have to use the command line BCDEDIT utility. To access BCDEDIT, run the Command Window as an administrator and type in BCDEDIT.
Unfortunately BCDEDIT isn’t an easy tool to come to terms with, especially as it’s purely command line-driven. So, a great tool to use here is EasyBCD by NeoSmart Technologies. EasyBCD offers a GUI frontend to BCDEDIT, and makes life much easier.
Once Vista is installed, call up the browser and navigate to the EasyBCD download page - download the latest version (1.7.2 at the time of writing), install and launch the application.

To configure the bootloader go to “Change Settings”. Here you can change the default OS if you prefer to boot into XP first. Under "Entry-Based Settings" you'll see the field which refers to the the XP partition. Overwrite "Earlier Version of Windows" with "Windows XP" and click "Save Settings".
Reboot the system and the changes are visible. You have a dual-booting Vista and XP system. That's all there is to it.
Open up Windows Explorer and there’s two hard drives – the primary disk running Vista and the secondary disk with XP installed. Restart the system and load up Windows XP, and the XP disk is now the primary, with the Vista partition running on the secondary D: drive
If you decide that dual-booting Vista and XP is not for you, EasyBCD lets you wind back the clock.
All you have to do is remove Vista’s boot manager – go to “Manage Bootloader”, select “Uninstall the Vista Bootloader” and then “Write MBR”. Restart the machine and that’s it – the XP boot loader is the only one left on the system and XP loads. You can then delete the Vista partition and use GParted to re-extend the partition to take up the entire disk, or the Extend command in Vista DISKPART.
Dual Boot Vista and XP with Vista already installed
Step 1 - Partition the Drive:
Vista comes with a nice partitioning tool, so i'll be using it instead of partition magic this time around.
-right-click computer under the start menu and choose "manage"

-right-click the drive you want to partition, and select "Shrink Partition"
-The amount you shrink the partition is the amount of space used for the XP partition, so i would suggest making it at least 3-
4GB in size, as a full XP installation will take 1.5GB on it's own.
-now right-click the unallocated memory and select new basic partition.

-Choose NTFS file system, this will save formatting before installation.
-name the drive anything you like, i chose "XP"
-click next on the rest of the screens and finish.
once the formatting is finished you will have something like this:

*this new partition is where your XP installation will go, so take note of it's location, in case there are multiple partitions
on the drive (there will now be atleast 2).
Step 2 - Install XP:

wait while XP installs (I won't go into detail, there are many tutorials on this, and it is reasonably straight forward)

Now that XP has installed, it attempts to boot for the first time... all goes fine, video settings, networking, then the lovely
welcome screen as usual.
You restart, expecting a boot loader screen... followed the tutorial this far, and now you seem to only have XP... well not
quite, I wouldn't leave you hanging without giving you a proper dual boot.

here lies the only real issue with installing XP after Vista, but it's a quick fix if you have your Vista CDs/DVD handy.
The problem is that Vista and XP use different boot loader utilities in the MBR (Master Boot Record) of your hard drive. XP does
not recognize Vista, but Vista will recognize XP, so we need to remove the boot loader that XP just put in with the old
Vista boot loader. So restart once more, but this time with your Vista disc in the drive.
Step 3 - Fix Boot Loader:
Vista will load the GUI files, and then display the loading splash screen.
-Click "Next" on the first screen
-Once the "Install Now" menu (do not click Install Now) choose "Repair Your Computer":

-You will be prompted to choose the OS to repair. Don't worry if Vista is the only OS that shows up, even after a search.


click "Next"
-I realize there is a "Fix Startup" option, but it's been my experience that it doesn't work, and this method will.
-choose to open a "Command Prompt":

type in the command prompt the following 2 lines (separatly):
Bootrec.exe /fixMBR
Bootrec.exe /fixBoot

-close the prompt and restart
-now that Vista controls your boot loader, the process is mostly finished, now we need to inform Vista that XP is installed, as to enable the boot loader selection screen.
*There are programs such as VistaBootPRO that will do this for you, but it requires .NET framework, etc, so I did it the manual way.
Step 4 - Edit boot.ini:
In Vista, the boot.ini is not editable directly, as the file itself is hard to locate, so we will be modifying it through "Boot
Configuration Data Store Editor" bcdedit.exe:
(Just as an explanation, the loader type for XP is an NT Loader, hence the use of ntldr)
-first open a command prompt with administrative privilages (right-click and choose "run as administrator")
*Note the following 2 answers from bcdedit for each item are acceptable:
"The Operation Completed Successfully"
"The Specified Entry Already Exists"
Be sure to type each line carefully (replace C in the first line with the drive containing your Vista installation):
bcdedit –set {ntldr} device partition=C:
bcdedit –set {ntldr} path \ntldr
bcdedit –displayorder {ntldr} –addlast
bcdedit -set {ntldr} description "Microsoft Windows XP"
The completed bcdedit file should resemble this:

-This will correctly add XP to your boot sequence, and even name it properly instead of "Earlier Version of Windows"
-the displayorder line also allows the entry to be visible under the advanced settings of your computer properties.

Vista is the default boot, if you wish to change this to XP it can be done by setting {current} to addlast, or under the computer
-> properties -> advanced settings.
If all done properly, XP and Vista will dual boot properly!
Vista comes with a nice partitioning tool, so i'll be using it instead of partition magic this time around.
-right-click computer under the start menu and choose "manage"
-right-click the drive you want to partition, and select "Shrink Partition"
-The amount you shrink the partition is the amount of space used for the XP partition, so i would suggest making it at least 3-
4GB in size, as a full XP installation will take 1.5GB on it's own.
-now right-click the unallocated memory and select new basic partition.
-Choose NTFS file system, this will save formatting before installation.
-name the drive anything you like, i chose "XP"
-click next on the rest of the screens and finish.
once the formatting is finished you will have something like this:
*this new partition is where your XP installation will go, so take note of it's location, in case there are multiple partitions
on the drive (there will now be atleast 2).
Step 2 - Install XP:
wait while XP installs (I won't go into detail, there are many tutorials on this, and it is reasonably straight forward)
Now that XP has installed, it attempts to boot for the first time... all goes fine, video settings, networking, then the lovely
welcome screen as usual.
You restart, expecting a boot loader screen... followed the tutorial this far, and now you seem to only have XP... well not
quite, I wouldn't leave you hanging without giving you a proper dual boot.
here lies the only real issue with installing XP after Vista, but it's a quick fix if you have your Vista CDs/DVD handy.
The problem is that Vista and XP use different boot loader utilities in the MBR (Master Boot Record) of your hard drive. XP does
not recognize Vista, but Vista will recognize XP, so we need to remove the boot loader that XP just put in with the old
Vista boot loader. So restart once more, but this time with your Vista disc in the drive.
Step 3 - Fix Boot Loader:
Vista will load the GUI files, and then display the loading splash screen.
-Click "Next" on the first screen
-Once the "Install Now" menu (do not click Install Now) choose "Repair Your Computer":
-You will be prompted to choose the OS to repair. Don't worry if Vista is the only OS that shows up, even after a search.
click "Next"
-I realize there is a "Fix Startup" option, but it's been my experience that it doesn't work, and this method will.
-choose to open a "Command Prompt":
type in the command prompt the following 2 lines (separatly):
Bootrec.exe /fixMBR
Bootrec.exe /fixBoot
-close the prompt and restart
-now that Vista controls your boot loader, the process is mostly finished, now we need to inform Vista that XP is installed, as to enable the boot loader selection screen.
*There are programs such as VistaBootPRO that will do this for you, but it requires .NET framework, etc, so I did it the manual way.
Step 4 - Edit boot.ini:
In Vista, the boot.ini is not editable directly, as the file itself is hard to locate, so we will be modifying it through "Boot
Configuration Data Store Editor" bcdedit.exe:
(Just as an explanation, the loader type for XP is an NT Loader, hence the use of ntldr)
-first open a command prompt with administrative privilages (right-click and choose "run as administrator")
*Note the following 2 answers from bcdedit for each item are acceptable:
"The Operation Completed Successfully"
"The Specified Entry Already Exists"
Be sure to type each line carefully (replace C in the first line with the drive containing your Vista installation):
bcdedit –set {ntldr} device partition=C:
bcdedit –set {ntldr} path \ntldr
bcdedit –displayorder {ntldr} –addlast
bcdedit -set {ntldr} description "Microsoft Windows XP"
The completed bcdedit file should resemble this:
-This will correctly add XP to your boot sequence, and even name it properly instead of "Earlier Version of Windows"
-the displayorder line also allows the entry to be visible under the advanced settings of your computer properties.
Vista is the default boot, if you wish to change this to XP it can be done by setting {current} to addlast, or under the computer
-> properties -> advanced settings.
If all done properly, XP and Vista will dual boot properly!
Virus and Anti Spyware with Paretologic softwares
ParetoLogic Anti-Spyware offers an advanced set of tools designed to protect you from spyware threats. There are two lines of defense:
Scanning and Removal
ParetoLogic Anti-Spyware provides effective scanning and removal of spyware. The technology behind this process involves the use of a powerful database of known spyware items. There are frequent database updates that are free and fast. With these updates your computer is safe from the most current spyware threats. You also have several methods of scanning to choose from including automatic scans.
Active Protection
To prevent unwanted items infecting your computer, ParetoLogic Anti-Spyware provides Active Protection. Now you can monitor Internet and system activity whenever you use your computer.
ParetoLogic Anti-Spyware offers an advanced set of tools designed to protect you from spyware threats. There are two lines of defense:
Scanning and Removal
ParetoLogic Anti-Spyware provides effective scanning and removal of spyware. The technology behind this process involves the use of a powerful database of known spyware items. There are frequent database updates that are free and fast. With these updates your computer is safe from the most current spyware threats. You also have several methods of scanning to choose from including automatic scans.
Active Protection
To prevent unwanted items infecting your computer, ParetoLogic Anti-Spyware provides Active Protection. Now you can monitor Internet and system activity whenever you use your computer.
What is PC tools Internet Security Tools
Another win for PC Tools Internet Security™ is that it includes multiple security software in one security suite.
PC Tools Internet Security™ includes anti-virus, anti-spyware and backup software in one package. This is great for novice computer users as the amount of protection you get is hard to beat, however, for the more experienced computer user, gamers, and the hardcore computer 'power users' out there...you will be disappointed with the amount of resources this thing uses.
It seems that PC Tools Internet Security™ should come with a disclaimer telling you that you might need to upgrade your processor and buy 2 GBs more ram just to run this software!
See how it works at www.pctools.com/
Free is good...lol
Does you computer know bitdefender.com?
Lock Out Viruses!
You lock up your home to secure it because you're proactive in protecting what's valuable to you. So what are you doing right now to keep the "bad guys" away from your PC -- and your personal information?
Today, new threats bombard your PC faster than most security products can react.Now you can attack back in a bold way by moving out to another level of protection.
check here at bitdefender.com
Free virus removal
1) http://free.avg.com/download-avg-anti-virus-free-edition
2) http://free.avg.com/
3) http://www.free-av.com/
4) http://www.avast.com/eng/avast_4_home.html
5) http://www.symantec.com/norton/theme4.jsp?themeid=free_tools_trials2
6) http://home.mcafee.com/Store/Downloads.aspx
2) http://free.avg.com/
3) http://www.free-av.com/
4) http://www.avast.com/eng/avast_4_home.html
5) http://www.symantec.com/norton/theme4.jsp?themeid=free_tools_trials2
6) http://home.mcafee.com/Store/Downloads.aspx
Spanning Debunked
The problems posed by spam have grown from simple annoyances to significant security issues. The deluge of spam costs up to an estimated $20 billion each year in lost productivity -- according to the same document, spam within a company can cost between $600 and $1,000 per year for every user.
The existing and proposed anti-spam solutions attempt to mitigate the spam problem and address security needs. By correctly identifying spam, the impact from email viruses, exploits, and identity theft can be reduced. These solutions implement various types of security in an effort to thwart spam.
You can learn more at: http://www.securityfocus.com/infocus/1763
Your Spam trouble Solutions
Online Spam Solutions blocks your company's spam for as little as $9.95 a month. onlinespamsolutions.com . Stop spam and viruses with our email filter. Spam filtering works with ..
Small and mid-sized businesses can now block spam and viruses just like a Fortune 500 company - at a fraction of the cost.
Online Spam Solutions,work almost exclusively with small and medium sized businesses.
They offer an inexpensive yet highly effective filtering method that protects you and your employees from unwanted spam and email viruses.
Exchange/SMTP spam filtering
Effective Spam Filter - free download, install in minutes and block over 98,5% spam. This AntiSpam (spam blocker) includes two AntiVirus solutions ...
Spam Firewall is a plugin for Movable Type that can help reduce this load. The goal of Spam Firewall is to block 80% of spam attempts before they reach MT's ...
SecurityGateway email spam firewall for Exchange/SMTP offers powerful spam filtering, simple administration, and accurate results.
Spam Firewall is a plugin for Movable Type that can help reduce this load. The goal of Spam Firewall is to block 80% of spam attempts before they reach MT's ...
SecurityGateway email spam firewall for Exchange/SMTP offers powerful spam filtering, simple administration, and accurate results.
Anti-Virus
email and Web security, powerful, easy to use, affordable solution, integrated hardware and software solution, ...Support - Products - Spam Firewall Overview
Thursday, June 11, 2009
Connect your LAN to the Internet using static or dynamic NAT
Just about every person on the planet who connects to the Internet uses network address translation (NAT) to do it. But there are two kinds of NAT -- static and dynamic -- and you need to know how to configure them. So what kind of NAT do you use, and how do you configure NAT?
In this screencast and tip, you will learn:
- Why you need NAT to connect to the Internet and what it does for you.
- The differences among various kinds of NAT.
- How to configure static and dynamic NAT to connect to the Internet.
Wednesday, June 10, 2009
FTC shuts down notorious Internet Service Provider
The Federal Trade Commission had a rogue Internet Service Provider that recruits, knowingly hosts, and actively participates in the distribution of spam, child pornography, and other harmful electronic junk shut down by a district court judge.
The FTC order shuts off Pricewert LLC, which does business under a variety of names including Triple Fiber Network (3FN) and APS Telecom, a company it said actively recruit and collude with criminals seeking to distribute a whole host of nastiness including child pornography, spyware, viruses, trojan horses, phishing, botnet command and control servers, and pornography featuring violence, bestiality, and incest. The FTC said Pricewert advertised its services in the darkest corners of the Internet, including a forum established to facilitate communication between criminals.
The FTC also alleges that the defendant engaged in the deployment and operation of botnets. Botnets can be used for a variety of illicit purposes, including sending spam and launching denial of service attacks. According to the FTC, the defendant recruited bot herders and hosted the command-and-control servers - the computers that relay commands from the bot herders to the compromised computers known as "zombie drones."
Transcripts of instant-message logs filed with the district court show the defendants' senior employees discussing the configuration of botnets with bot herders. And, in filings with the district court, the FTC said that more than 4,500 malicious software programs are controlled by command-and-control servers hosted by 3FN. This malware includes programs capable of keystroke logging, password stealing, and data stealing, programs with hidden backdoor remote control activity, and programs involved in spam distribution.
Pricewert, based in San Jose, California, shielded its criminal clientele by either ignoring take-down requests issued by the online security community or shifting its criminal elements to other Internet Protocol addresses it controlled to evade detection, the FTC said.
According to an IDG News Service report, Max Christopher, a representative of Pricewert, said Thursday the company would not have an immediate response to the FTC complaint. "We are a bit confused by the complaint," he said.
In an interview with The Washington Post's Security Fix, FTC Chairman Jonathan Leibowitz said the agency's action target's one of the Web's worst actors.
"Anything bad on the Internet, they were involved in it," Leibowitz said. "We're very proud, because in one fell swoop we've gone after a big facilitator of some of the utterly worst conduct."
The court issued a temporary restraining order to prohibit Pricewert's illegal activities and require its upstream Internet providers and data centers to cease providing services to Pricewert. The order also freezes Pricewert's assets. The court will hold a preliminary injunction hearing on June 15, 2009
Saturday, June 6, 2009
Here's your bespoke application.Thanks for your custom!
During the initial days of my assignment in the London office, I was bewildered by the term ‘bespoke application’. “They need a bespoke application for CRM.” What? The only time I had heard the words ‘spoke’ and ‘application’ in the same sentence was when someone told me about an application built on top of a hub and spoke architecture or when someone simply said “I spoke to him about the application.” :-P Well, I now know that ‘bespoke application’ means ‘custom built application’ or simply ‘custom application’. But I also realized why Londoners don’t use the word custom here. On my way out from a grocery, I noticed the message “Thank you for your custom” (meaning thank you for your purchase/patronage). Interesting localization tidbit.
Wednesday, June 3, 2009
14 Important Tools for IT Pros
RoboForm Pro and Portable: Password manager, form filler, and password management.
CCleaner: File system and registry cleaner.
Autoruns: Startup process manager; shows programs configured to run during system bootup or login.
Process Explorer: Lets you see which handles and DLL processes are open.
Vipre: Antivirus, malware, and rootkit software.
Spybot S&D: Suite of PC security products.
SIW: Software Information for Windows; gathers and displays detailed information about system properties and settings.
DotNet cleanup tool (dotnetfx_cleanup_tool): Aaron Stebner's tool Automated cleanup tool for removing the .NET Framework.
Auslogics Disk Defrag: Hard drive defragmenting software.
Auslogics Registry Defrag: Registry defragmenting
Google Chrome: Windows browser that's getting a lot of good reviews.
Synergy/DE: Suite of advanced cross-platform software tools for Windows, UNIX, and OpenVMS.
PuTTY: Telnet and SSH for Windows and UNIX.
FileZilla: Open source FTP client and server.
Subscribe to:
Posts (Atom)